Week 12 - 5/17/18 - Blog 2

We realized that we need to have a bigger sprocket on the bike so that it is geared for torque rather than speed. We had geared for speed only and it spun really quickly off of the ground, but once we put someone on it, it couldn't handle it. We do not have sprockets that are big enough and not enough time to to buy a new one online, so we are turning bike 1 into bike 2 and using the big gear that is already on the bike. This will allow it to be geared for torque and hopefully a successful run.

Week 12 -  5/15/18 - Blog 2

Today, we added metal L-Brackets to the battery/motor box to make sure it is stable and won't fall apart. We also added another wooden piece underneath the box so the chain is really tight. We tested the bike and have run into a problem with the chain skipping at the beginning of the throttle-on. We think this is due to the chain not surrounding our motor sprocket enough. 

EDIT- We came back after class and added a new sprocket to the outside of the chain to push it in more, so that it's tighter around the motor sprocket. We tested it off of the ground, with no one on it, and it runs smoothly and very fast. Once we put someone on it, the motor cannot seem to push the weight and works if you do not give it much throttle but if you go full force, the chain pops off. 


Week 11 - 5/11/18 

Today, we changed the sprocket to the one we used in bike one because the sprocket that is on the bike does not properly fit the chain. We also have come to the realization that the reason the chain was popping off of our sprockets was because of the distance between the two sprockets and not which link we used. We are putting another piece of wood under the battery and motor box to raise the motor and sprocket up a tad to make the chain the perfect distance. We also moved the motor back a little to be lined up with the new sprocket we added.


Week 11 - 5/9/18

Today we drilled holes in the bike and cut out a bracket for the switch to be attached to. We also used hot glue to try to keep the switch in the hole we made. It is pretty secured now. We ran the wires through the bike today and everything is connected. We also did a test run and we ran into an issue regarding out sprocket not fitting our chain completely. We will address this problem next class.


Week 11 - 5/7/18

Today we cut out a side panel for the battery and motor box and drilled a hole for wires to run in and out to the switch that we will add soon and the throttle in the front of the bike. The side panels were attached using wood glue and zip ties. We will run the wires through the bike soon, zip tying it to the bars on the bike.


Week 11 - 5/3/18

Today we placed the batteries, motor controller, and motor together on the back of the bike and began wiring them together with the throttle. The next step is to acquire and add an ON/OFF switch for easy use. Next class we will also be adding the chain to the motor and working out any kinks in our design. After that, testing on the second bike can begin.

Week 10 - Blog 2 - 4/27/18

Today we cut the bracket to shape for the motor and batteries. We also attached the sprocket to the motor and tested it. It runs well far but we need to figure out the switch situation and mount the motor controller and batteries. The speed of this motor is much higher than the first bike's.


Week 10 - 4/23/2018


Today we figured out what to do for our motor and sprocket for bike 2. We still need to figure out what to do for our switch. We may buy it or 3d print a key for a key switch in class. We will next mount the batteries and motor to the wooden bracket. Bike 1 is complete except for the chain popping off. We found a derailer to use for this issue.


Week 9 - Blog 2 - 4/19/2018

Today we did test runs on bike one with power. We also mounted the wooden bracket to bike two and are working on the rest of the battery box today. Bike one runs well but is having problems with the chain popping off. It is easy enough to put back on but is not good for when we are driving.


Week 9 - 4/17/19


Today we cut the wood for the piece that the battery will be resting on. We plan on attaching it to the metal brackets soon. On bike 1 we put washer on the motors axle then mounted the sprocket to the chain and ran the bike. It runs well, but does not have enough torque to speed up the bike from rest. We will work on solving this next class.


Week 8 - Blog 2 - 4/11/2018 Blog 

Today we finished putting the back metal brackets on the bike. We plan to put the wooden piece on after the front metal brackets are on. We want to finish the first bike before we spend all of our time on this one. We are finishing the chaining of it currently and hope to get it running soon.


Week 8 - 4/9/2018

Today, we got a good amount done. We are adding a master link to bike ones chain from the motor sprocket to the chains on the bike. The motor is mounted safely to the bike. We drilled holes into the bikes frame to make it easier to bracket. We are nearing completion of the first bike and started on the second bike. We measured out and drilled holes for the battery bracket. We successfully completed the right side of the bracket connecting to the bike. Once we finish the left side, we can put a platform on top of it and put the batteries and motor controller on top.


Week 7 - Blog 2 - 4/5/18 


Today we are firmly attaching the motor to the bike and attaching the chain to the sprocket of the motor. Once we lengthen the chain more we can attach it and run the whole system. Hopeful for the bike to be completed today. If we run into any problems, it may need to be completed next week.

EDIT : We cannot attach the chains to the motor yet because the sprocket we have on the motor is not the right size for the chains. We have taken the sprocket off and are ordering a new one now.


Week 7 - 4/3/18 

This week we are ordering the parts for the next bike and plan on finishing up the first one in the coming days. Today we are finishing the wooden battery box and connecting the system to test for any problems. We are using a hinge on the top of the box so if any fire starts we can quickly address it.


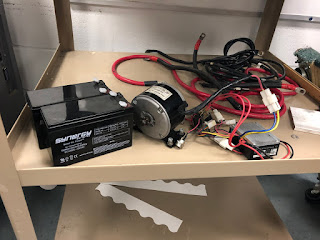
Razor Electrical Kit For Dune Buggy (V1+) Drifter (V1+) Go Kart (V13+)


BATTERY REPL.. RAZOR GROUND FORCE ELECTRIC GO KART - 2 Pack ( Battery Only - Reuse Existing Connector )


Week 6 - Blog 2 - 3/22/18


We are nearing in on finishing the first bike. We have attached the bracket and batteries and we are finishing the side paneling for it so it can stay secure. The throttle system is on and working. If not finished today, it will most likely be completed upon return after spring break.

Battery Bracket


Installed Throttle System

Blog Week 6 - 3/20/18


We now have both bikes and have begun construction of the first bike. We plan on finishing (or at least coming close) the first bike this week and starting the 2nd bike next week. We are using the metal bracket on bike two because it has skinnier bars and the brackets fit on this one and not bike one. Bike one will use a wooden platform instead.


Blog Week 5 - 3/12/18


John now has a truck that we will be using to transport the rest of the parts needed to begin building. We are waiting on an axle to be aligned so we can begin construction of the first bicycle. Currently, we are looking for the most ergonomic layout for all parts that we will be adding to the bike and even the parts that are already on it.


Blog Week 4 - 3/05/18


We were unable to begin our construction process due to a substitute being in place of our supervisor/facilitator. We will continue the project when he returns. We have preliminary parts ready for attachment, but we are waiting on a battery bracket and throttle to begin building. Hopefully we will begin building sometime next week if all of our parts are in.


Blog Week 3 - 2/26/18


We are currently waiting on our batteries to come in so we can start our assembly of the first bicycle. We are using Amazon Prime to get the parts shipped to us as fast as possible.
Image result for batteries 12v
Blog Week 2 - 2/22/18

Solidworks complete... Soon we will bring our bikes in and begin building.


Blog Week 1 - 2/13/18


Proposal -           We are performing three separate electric conversions on two pre-existing                                      bicycles and a motorcycle with a higher budget


Timeline -           Week 1- Plan all three bikes
                                      Week 2- Sergio Bike build
                                      Week 3/4 - Parts and planning for Parker Bike
                                      Week 5/6 - Parker Bike Build
                                      Week 7/8 - Plan and parts for John Bike
                                      Week 9,10,11 - John Bike build
                                      Week 12 - Review and present bikes


Budget -             Sergio Bike
                                      Donated Parts

                                      Parker Bike
                                      Donated bike
                                      Motor - Amazon or 601
                                      Batteries - 601
                                      Motor controller - Amazon
                                      Mounting - 601

                                      John Bike
                                      Everything from Everywhere